
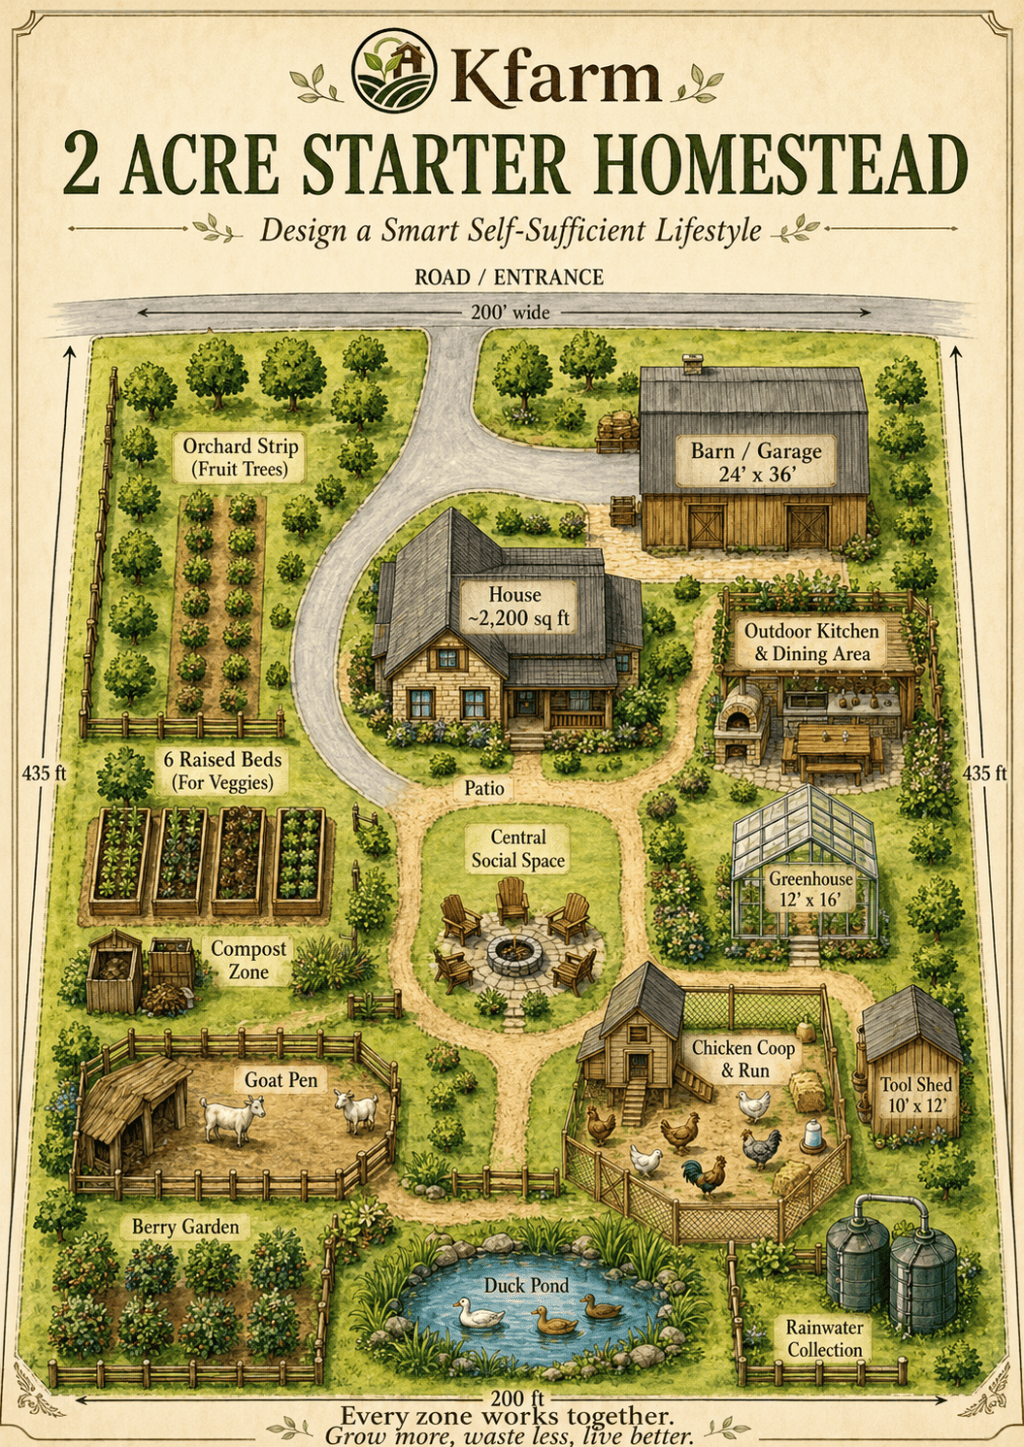
A zone-by-zone guide to KFarm’s 2 Acre Starter Homestead: what the illustration suggests, what needs checking and how the parts connect.
Jump to a section: Start with the idea, then read the land · Does the layout really fit on two acres? · Map the features the poster does not show · House and patio: the daily starting point · Driveway and barn: plan the largest movements · Orchard strip: leave room for the future tree · Six raised beds: plan what you will actually grow · Greenhouse: define its season and job · Outdoor kitchen: connect the garden to the table · Central social space: keep the reason for the homestead · Chicken coop and run: draw the care routine · Goat pen: a separate animal decision · Berry garden: make picking and maintenance accessible · Compost: follow the material, not just the bin · Duck pond: choose the purpose before the shape · Rainwater collection: draw the source and destination · Tool shed: place tools near the work · What the illustration establishes—and what it leaves open · A practical sequence for adapting the layout · Explore the connected guides
Start with the idea, then read the land
The 2 Acre Starter Homestead brings a house, orchard, vegetable beds, greenhouse, animals, storage and outdoor living into one connected place. Its appeal is easy to understand: you can imagine walking out of the house, gathering food, checking the animals and returning to a table outside.
This walkthrough follows the KFarm layout shared on Instagram. It explains what each area contributes, which connections deserve a closer look and what must be resolved before adapting the arrangement to a real property. The drawing is a concept illustration. The sizes printed on it are reference labels; the illustrated proportions do not establish a measured construction plan.
View the original KFarm 2 Acre Starter Homestead post on Instagram. Keep the image open as you move through the zones below.
Use a copy of your property survey or other reliable measured base drawing for your own notes. Mark what already exists before adding anything from the poster. The purpose of the exercise is to discover which parts of the idea suit your land and your daily life.
Does the layout really fit on two acres?
Two acres equal 87,120 square feet. The poster labels the lot approximately 200 feet wide and 435 feet deep. Multiplying those dimensions gives 87,000 square feet, or about 1.997 acres. The 120-square-foot difference is consistent with a rounded two-acre description.
That answers the arithmetic question, but it does not demonstrate that every illustrated feature fits at the shown size. The perspective changes the apparent relationship between objects. Paths, mature trees and building surroundings need measured space too. An appealing arrangement can be a useful starting point while still needing a complete scale drawing.
Begin an area budget with the actual property boundary, the house footprint, existing structures and areas that cannot be allocated freely. Then draw access, service space and the remaining usable areas. Avoid subtracting the house’s stated living area as though it necessarily equals the area occupied on the ground.
The most useful response to “Would all of that fit?” is a second drawing: a measured site plan showing real footprints, required separations and the land that remains. Keep the original poster beside it as a record of the idea.
Map the features the poster does not show
The illustration has no complete map of utilities, septic infrastructure, property restrictions or seasonal conditions. Before assigning the open spaces, make an observation layer for slope, wet areas, existing trees, shade and access. Make a separate layer for confirmed property information and unresolved questions.
If the property has septic, identify its components and any designated replacement area before drawing gardens or buildings. EPA advises keeping vehicles off the drainfield and diverting excess surface water away from it. Its planting guidance also favors appropriate shallow-rooted cover rather than a vegetable garden over the field. Read EPA’s septic care guidance.
Keep a question mark on information you have not confirmed. A blank area on a marketing image is not evidence of buildable land. Bring the parcel-specific questions to the relevant local office or professional before settling the plan.
Start with Before You Build: Read the Property First, then use Your Septic Area Is Part of the Plan for the features that are easy to overlook.
House and patio: the daily starting point
The house sits near the center of the upper portion of the layout, with a patio opening toward the social area. This gives it a visual connection to the growing areas and outdoor living. For your property, begin at the door that will actually carry most of the daily traffic.
The label “approximately 2,200 square feet” does not tell us whether it describes total interior floor area or the building footprint. A two-story house and a one-story house with similar living area can occupy different amounts of land. Porches, steps and attached working areas also need their own space.
Trace three everyday trips from that door: to the vegetables, to storage and to the animals. Note what you carry on each trip and what you need when returning. A place for muddy boots, a basket or a hose may matter more in daily use than perfect symmetry.
Preserve space for household activities that the poster leaves implicit: laundry, deliveries, visitors and routine maintenance. Decide which of those movements should use the front approach and which need a separate working route.
Driveway and barn: plan the largest movements
The driveway enters from the road and curves toward the house and the barn or garage. Its printed width is 20 feet. That is a label on this concept, not a universal access standard. The drawing does not establish turning geometry, grades or the route needed by your particular vehicles.
The barn or garage is labeled 24 by 36 feet, a rectangular footprint of 864 square feet. Space in front of its doors remains part of the planning problem. Draw the approach with the door open, the vehicle present and someone unloading. Include the return journey out of the property.
List what the barn will store before copying its size. A workshop, garden tools, feed storage and vehicle parking compete for different kinds of access. Something that fits inside a building may still be awkward to move into it.
Keep bulky deliveries and everyday pedestrian movement visible on the same drawing. Walk the route with the largest cart or vehicle relevant to the task, and obtain site-specific access advice where needed. Plan the Routes First explains how to separate delivery access, harvest flow and routine work.
Orchard strip: leave room for the future tree
The orchard occupies the upper-left side of the poster. It creates a strong growing zone beside the approach to the home. The useful idea is a recognizable orchard area with an accessible edge; the illustrated number of trees is not a planting schedule.
Before choosing positions, make a plant list suited to your location and goals. For each proposed tree, record the cultivar and rootstock, expected mature dimensions, pollination information and how you intend to reach it for care and harvest. Verify those details with local Extension guidance and the actual plant supplier.
Draw the mature canopy, then check its relationship to the driveway, beds, buildings and any underground infrastructure. Trees that appear comfortably separated as young plants can change the light and working space around them as they grow.
Also plan what happens during harvest. Where will a full basket go? Can you bring tools to the tree without crossing planted beds? A smaller orchard with a clear care routine may suit the household better than reproducing every tree symbol.
Six raised beds: plan what you will actually grow
The poster places six raised beds below the orchard and near the house. That creates a distinct vegetable area without making the whole yard a garden. Start by selecting the vegetables and herbs your household uses frequently, then assign manageable planting space.
NC State Extension emphasizes direct sunlight, drainage, access and a convenient clean water source when selecting a vegetable garden site. It describes six hours of direct sun as a minimum general target, with more light preferable, while noting differences between crops. Read the vegetable gardening handbook.
The drawing does not label bed dimensions. Six beds can mean very different amounts of soil, planting space and work. Record their actual dimensions and the clear paths between them. Test reaching the intended growing area without stepping into it, using the people and tools that will maintain it.
Give harvested food a destination. Mark where baskets rest, where tools are returned and how the route continues to the house or outdoor kitchen. You can begin with fewer beds and keep the remaining area accessible while you learn what your routine supports.
Greenhouse: define its season and job
The greenhouse is labeled 12 by 16 feet, giving a nominal rectangular footprint of 192 square feet. It sits to the right of the central living area. Before adopting that location, decide what you want the greenhouse to do: start seedlings, shelter particular crops or support a longer growing season.
Write a short operating brief. Which months will it be used? Who will check it during the day? How will water reach it? Where will trays, pots and growing media be stored? Which questions about ventilation, heating or anchoring need answers from the supplier or installer?
Draw benches, the entry and a working aisle within the footprint. Keep a place for incoming supplies and outgoing plants outside the door. A greenhouse can be visually prominent while its less attractive service needs remain hidden from the illustration.
Observe the proposed location at different times rather than inferring sunlight from the artwork. In the starter plan, its relationship to the house, outdoor kitchen and trees deserves particular attention as you convert the scene into a measured drawing.
Outdoor kitchen: connect the garden to the table
The outdoor kitchen and dining area is one of the layout’s most distinctive features. It lies beside the house, below the barn and above the greenhouse. As a concept, it connects growing food with enjoying the place you are building.
Decide whether you want occasional outdoor cooking, a harvest-preparation surface or a larger entertaining space. Draw the journey from the indoor kitchen, the garden and the seating area. Leave room for someone to cook while others move past, and provide a landing place for what they carry.
The illustrated shelter does not specify a safe installation for a grill or oven. USFA advises locating grills away from siding and railings and clear of eaves and branches. The actual appliance and its installation requirements must guide the design. See the outdoor fire safety guidance.
Water supply, wastewater, cleaning, storage and the relationship to animal routines all need their own decisions. We cover these in Plan an Outdoor Kitchen for Your Homestead, including a phased approach and an equipment specification you can prepare before shopping.
Central social space: keep the reason for the homestead
The central social area gives the poster a place to pause. The paths and surrounding activities are organized around a shared outdoor space. This is worth preserving as a planning question even if your version has a table, shaded bench or open lawn instead of the illustrated fire feature.
Ask when the household will use it. Morning coffee, evening meals and children’s play lead to different preferences for shade, visibility and nearby activity. Try temporary seating in the proposed spot before fixing its outline with permanent landscaping.
Check the space while chairs are occupied and pulled out. People still need to move between the house and the working areas. A path that looks generous without furniture can feel quite different during a gathering.
If you include a fire feature, resolve its location and use separately with the equipment guidance and local conditions. Do not measure required separation from the poster. Leaving open space is a valid part of the plan.
Chicken coop and run: draw the care routine
The chicken coop and run sit below the greenhouse, with the tool shed nearby. This establishes a recognizable animal area, but the picture does not provide enough information to determine a suitable flock size.
Plan the morning and evening routine on paper: reaching the coop, handling feed and water, gathering eggs, cleaning and returning to the house. List the supplies that must stay dry and the tools that should have their own storage. Include access for repairs and removal of used bedding.
CDC recommends washing hands after handling poultry or their environment and keeping poultry away from food preparation and eating areas. It also advises using dedicated footwear outside the house. Read the backyard poultry guidance.
Choose the enclosure and flock together with appropriate husbandry guidance for your setting. The illustrated fence, bird count and apparent spacing are artistic details, not evidence of predator protection, welfare capacity or a complete management system.
Goat pen: a separate animal decision
The goat pen appears on the lower-left side, near compost and berries. It shows goats as part of the homestead idea, but the total acreage does not tell us how many animals the property can support or whether the illustrated enclosure is suitable.
Begin with the purpose of keeping goats and the daily responsibility it creates. Prepare questions about feed, shelter, fencing, veterinary care, manure handling and any grazing you intend to provide. Resolve those with appropriate local livestock guidance before assigning animals to a small shape on the plan.
Sketch a delivery route for feed and a maintenance route for the enclosure. Mark the neighboring growing areas you need to protect and the gates you will use. A compact animal space can require support space elsewhere on the property.
Goats are optional in an adaptation of this concept. If they do not fit your household, the zone can remain uncommitted until you have a use with a manageable routine. There is no need to reproduce every depicted activity.
Berry garden: make picking and maintenance accessible
The berry garden occupies the lower-left edge beneath the goat pen. It adds another kind of harvest and a smaller-scale growing area distinct from the orchard. Use the zone as an invitation to compare crops that suit your site.
Choose the crop before selecting the layout. Record its mature form, support needs, care schedule and access for picking. A row of brambles and a group of compact bushes should not be represented by the same generic spacing simply because both produce berries.
Walk through the proposed harvest routine with a basket. Include reaching the far side of the planting, removing pruned material and maintaining its edges. Note the adjacent animal fence and where tools will be set down.
If the household is beginning with vegetables and fruit trees, consider leaving this zone for a later phase. Keeping its access route open now can make a future planting easier without requiring every productive area in the first season.
Compost: follow the material, not just the bin
The compost zone sits beside the growing area on the left. Its useful relationship is the movement of suitable material into composting and finished compost back toward the garden. The bin itself is only one part of that arrangement.
EPA’s home-composting guide describes balancing carbon-rich and nitrogen-rich materials with moisture and air. It also identifies materials unsuitable for a basic backyard pile. Use EPA’s home composting guidance to establish the process you intend to manage.
On your plan, show space for collecting materials, working beside the bin and loading a cart. Decide where dry material will wait and how you will reach the pile when the ground is wet. Keep its service route visible in relation to the beds and storage.
Do not assume that every animal waste stream belongs in the same household compost process or can go straight onto food crops. Keep manure management as a separate question requiring an appropriate method. The poster illustrates adjacency; it does not establish treatment or food-safety controls.
Duck pond: choose the purpose before the shape
The pond is near the bottom of the poster. It completes the scene visually, but an image cannot establish whether a particular piece of land can support that feature. Decide whether the goal is an ornamental water feature, an animal-management feature or something else.
List the questions the drawing leaves open: where water comes from, where overflow goes, how the feature is maintained, how people and animals are kept safe and how servicing equipment reaches it. Record unanswered questions rather than treating an illustrated blue shape as a completed water plan.
Do not assume the bottom of the page represents the lowest elevation on the land. Observe the actual site and obtain appropriate advice before excavation or construction. A pond’s relationship to buildings, utilities and other water features needs to be established on the real property.
For an early phase, keeping this area open may be the most useful choice. The homestead can still have connected growing and living spaces while the water-feature decision remains unresolved.
Rainwater collection: draw the source and destination
The rainwater tanks appear at the lower right. To turn that symbol into a useful system, connect it on paper to its intended collection surface, storage location, overflow destination and end use.
Collected rainwater is not automatically safe for drinking or food preparation. CDC recommends matching water quality to its intended use and keeping collected rainwater from contaminating safe piped water. Read CDC’s rainwater overview.
The location that looks balanced in the poster may be inconvenient for the actual roof or garden. Check the planned connections, maintenance access and the consequence of a full tank during rain. Do not infer tank capacity or reliable year-round supply from the illustration.
Before Fall Rains: Trace These Five Water Paths Around Your Home provides a starting observation exercise. Complete that exercise before deciding how a new collection system will interact with existing drainage.
Tool shed: place tools near the work
The tool shed is labeled 10 by 12 feet, a nominal rectangular footprint of 120 square feet. Its position near the poultry area makes it a useful prompt to think about what belongs close to each task.
Make an inventory grouped by activity: garden tools, animal-care tools, repair supplies and outdoor-living equipment. Then decide which items belong in the barn, which need to be near the garden and which require separate handling or storage.
Draw the doorway with the largest item moving through it. Include room to turn, put something down and return tools without rearranging the entire shed. A building that holds everything tightly can still be a poor workplace.
Compare the path from the shed to the beds with the path to the animals. You may prefer more than one modest storage point rather than copying one location. The criterion is whether each regular task has a sensible beginning and end.
What the illustration establishes—and what it leaves open
The parcel labels are approximately consistent with two acres. The house label remains ambiguous about living area versus footprint. The barn, greenhouse and shed dimensions give nominal rectangular areas but do not include surrounding working space. The bed sizes and animal capacities are not established.
The image also leaves orientation, ground levels, septic, utilities, installation details and site-specific constraints unresolved. Treat those as layers to add when adapting the concept.
Visual changes such as stronger shadows or different planting arrangements do not by themselves demonstrate a corrected measured plan. Any future annotated version should identify the particular change and the information supporting it.
Keep the original concept, any later illustrated variations and the measured plan for your own property clearly identified. This allows the artwork to remain recognizable while practical corrections become explicit.
A practical sequence for adapting the layout
First, document the land. Assemble the measured base, walk the site, record water and access observations, and resolve the information that determines where activity can occur. Use the free KFarm land-buying checklist if you are still evaluating a property.
Second, choose the first daily system you can maintain. That could be a modest vegetable garden with water and tool access, while other zones stay open. Write down who will care for it and how the work fits the household.
Third, add long-lived features only after their placement questions are answered. Compare the orchard, greenhouse, animal areas and outdoor kitchen against one another so that one project does not consume another’s required access.
Finally, review the arrangement after actual use. Record muddy crossings, unnecessary carrying, unused space and tasks that take longer than expected. Those observations are the strongest brief for the next change.
Explore the connected guides
Use Outdoor Kitchen Planning for the cooking and dining area; Water Paths for site observations; Septic Area Planning for hidden infrastructure; and Access and Daily Routes for movement around the property.
For more KFarm planning scenarios, explore the American Homestead Atlas. You can review the product and current purchase details in KFarm’s Etsy listing.
What would you change first in this two-acre layout? Move the kitchen, reduce the animal areas, enlarge the vegetable garden or leave more open space? Tell us your acreage and the reason behind your choice.


Leave a comment